Facebook also gives its users the choice to delete the account or simply deactivate it. If you want to take and be away for some time without completely shutting down your account, then ensuring that your Facebook account is deactivated is the best option. This guide takes you through the process of How to Temporarily Deactivate Facebook Account: A Step-by-Step Guide
Read: How to Find Live Videos on Instagram Without Following Anyone
Step 1: Open the Facebook App

To begin with, locate and tap on the Facebook application on your mobile phone. To make a better understanding, we will use the image below for an illustration of the my profile icon position. In the lower right part of the screen, there is a menu icon (sometimes this is called the ‘three horizontal lines’). Click on this icon to go on.
Step 2: Access Settings and Privacy

After succeeding in opening the menu, please scroll down and then click on the Settings & Privacy option. This will unveil more options regarding the settings features.
Step 3: Find in Account Settings

Then, from the drop-down options, choose Settings. From there you are brought to the area of the main settings, where you can manage many things regarding your Facebook account.
Step 4: Go to the Account Center

In the settings, you can find the Account Center available option. Click on it so that you can go to the section where you can manage personal information, account control, and other connected services.
Step 5: Select from among Personal Details and Account Ownership.

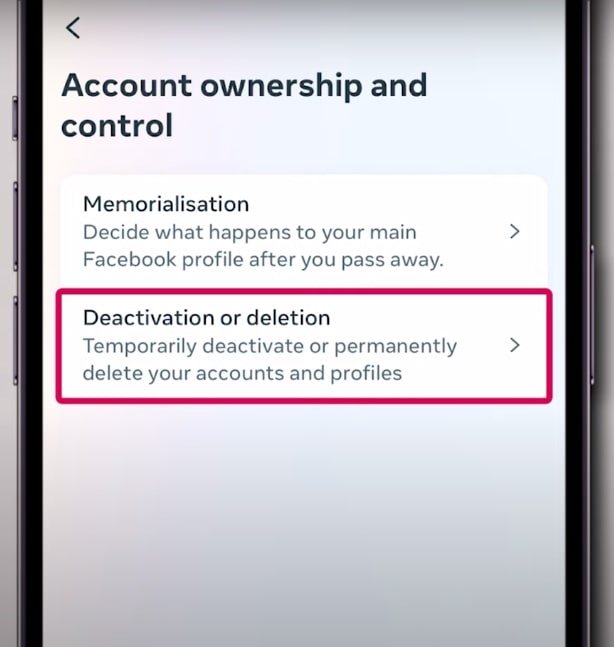
From the Account Center, the user should choose Personal Details and should select the option of Account Ownership and Control. This is the one that has features allowing the user on the website to manage his or her account status including deactivation.
Step 6: Make your choice between the Deactivation and Deletion Options.

Next, you’ll see the Deactivation and Deletion options. Continue to tap on this to proceed. This option will lead to two choices either Deactivate Account which is temporary or Delete Account which is permanent.
Step 7: You should select “Deactivate Account”

For a temporary break, select Deactivate Account. Facebook will request you to perform a security check and will ask for the login password. Type in your password and click on Continue.
Step 8: Follow Final Prompts
After confirmation of the password, please follow the other prompts as initially suggested device. When you complete these steps, Facebook will deactivate your account. At this time, your page cannot be seen by others. If you want to log in again at a later date, your account will be active and you will be able to do so.
Conclusion
Now we are getting to the favorable one that sounds appealing to all users. This feature is uncomplicated and all you have to do is to use such a comfortable option to utilize the service without using it. If you want to take a break from the platform, you can quite easily deactivate your account using the aforementioned procedures. In case you wish to come back it could be as simple as logging in and your account including the profile is untouched except for time.


