
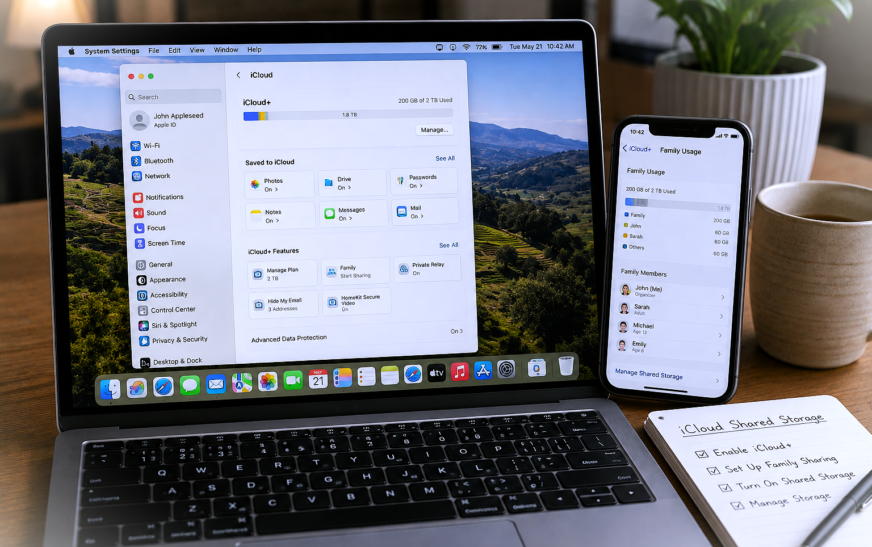
To set up iCloud shared storage for family, the account organiser goes to Settings → [Your Name] → Family Sharing → Set Up Family on iPhone, or System Settings → [Your Name] → Family Sharing on Mac, then upgrades to an iCloud+ plan of 200 GB or higher and enables storage sharing. Once storage sharing is turned on, invited family members draw from the same shared storage pool — each person’s iCloud data stays private. Up to 5 other family members can be added and each accepts via an invitation sent to their Apple ID. The whole family can then manage and monitor usage from their own device under Settings → [Name] → iCloud.
Setting up iCloud shared storage for family is one of the most practical things you can do with an Apple subscription — instead of paying for separate iCloud plans for each family member, everyone draws from one shared storage pool that the organiser pays for. One subscription covers backups, photos, files, and iCloud Drive for up to six people.
The setup process spans a few steps across both the organiser’s account and each family member’s device, which is where most people run into confusion. This guide walks through every stage — choosing the right plan, creating the Family Sharing group, enabling storage sharing, inviting each member, and making sure their devices are actually using the shared pool rather than their own old plan. Whether you’re setting this up from scratch or trying to fix a Family Sharing invite that went wrong, every step is covered here.
Before You Start — What You Need
Check These Requirements First👤 Apple ID requirements
Every family member needs their own Apple ID. Children under 13 need a Child Account created by the organiser — they can’t create their own Apple ID. The organiser must be 18 or older and have a payment method on file.
📱 Device and software requirements
Family Sharing with iCloud storage sharing works on iPhone running iOS 16 or later, iPad running iPadOS 16 or later, Mac running macOS Ventura or later, and Apple TV running tvOS 16 or later. All devices must be signed in to the correct Apple ID.
💳 Payment method requirement
The family organiser must have a valid payment method on file — credit card, debit card, or PayPal. Apple Cash and gift cards cannot be used as the primary payment method for an iCloud+ subscription shared with family.
🌐 Country / region requirement
All family members must have Apple IDs in the same country or region. You cannot share iCloud storage across different regional Apple IDs — a UK Apple ID cannot join a Family Sharing group managed from a US Apple ID.
👥 Family size limit
One Family Sharing group supports up to 6 people total — the organiser plus 5 members. Each person can only be in one Family Sharing group at a time. To move someone from one group to another, they must leave the current group first.
Apple’s smallest iCloud plan — 50 GB for $0.99/month — cannot be shared with family members. Only iCloud+ plans of 200 GB ($2.99/month) and above support family storage sharing. If you’re currently on the 50 GB plan and want to share storage, you’ll need to upgrade to 200 GB or higher before the sharing option becomes available.
Which iCloud+ Plan Do You Need?
Choose Before Setting Up Family SharingThe right plan depends on how many family members will share it and how much storage each person typically uses. A rough guide: iPhone backups average 3–8 GB each, a large photo library can be 20–100 GB, and iCloud Drive documents are usually under 5 GB per person.
💾 iCloud+ 200 GB Most Popular
Shared across up to 6 people. Works well for families where members have moderate photo libraries and normal iPhone backup sizes. Tight for families with avid photographers or multiple iPads.
⭐ iCloud+ 2 TB Best Value for Families
2 TB shared across 6 people equals ~333 GB per person — comfortable headroom for most families including those with large photo libraries. This is the plan most families ultimately settle on after outgrowing 200 GB.
⚡ iCloud+ 6 TB Power Users
6 TB shared across 6 people equals ~1 TB per person. For families where multiple members shoot high-resolution video, maintain large iCloud Drive libraries, or work with large creative files.
🚀 iCloud+ 12 TB
12 TB shared across 6 people. For professional-level storage needs — video producers, photographers, or families with multiple members who maintain large project archives in iCloud.
Apple makes upgrading between iCloud+ plans seamless and instant — you can go from 200 GB to 2 TB at any time from Settings. There’s no penalty for upgrading mid-month; Apple prorates the cost. Starting on 200 GB and watching the family’s actual usage for a month before upgrading gives you real data to base the decision on rather than guessing in advance.
Step 1: Create Your Family Sharing Group
Organiser Does This First — Required Before Sharing StorageFamily Sharing is the framework that iCloud storage sharing lives inside. If you don’t already have a Family Sharing group set up, create one first. The person who creates the group is the Family Organiser — they control the shared subscriptions and pay for the iCloud+ plan.
On iPhone or iPad:
On Mac:
The Family Organiser role cannot be transferred after the group is created — the only way to change who the organiser is would be to dissolve the group and have a different person create a new one. Choose the organiser carefully. It should be the adult whose payment method will be used for the shared subscription — typically one parent in a family setup.
Step 2: Upgrade to a Shareable iCloud+ Plan
Organiser Must Be on 200 GB or HigherThe family organiser needs to be on an iCloud+ plan of at least 200 GB before storage sharing can be turned on. If you’re on the free 5 GB plan or the 50 GB plan, this step upgrades you. If you’re already on 200 GB or higher, confirm sharing is enabled in Step 3.
On iPhone or iPad:
On Mac:
When you upgrade from 50 GB to 200 GB mid-month, Apple charges only the difference for the remaining days of the current billing period — you’re not charged a full extra month. The new storage is available immediately after the upgrade completes, and subsequent billing cycles charge the new full plan price on your usual billing date.
Step 3: Turn On iCloud Storage Sharing
The Key Step — Storage Sharing Isn’t On by DefaultHaving a Family Sharing group and an iCloud+ plan doesn’t automatically share the storage. The organiser must explicitly turn on storage sharing — this is the step most people miss, which is why family members can have a Family Sharing group but everyone’s still using their own separate storage.
On iPhone or iPad:
On Mac:
From the moment storage sharing is turned on, the entire iCloud+ plan cost is charged to the Family Organiser’s payment method. Family members do not pay separately or contribute to the cost — the organiser covers everything. Make sure the person setting up the group is genuinely the person who will pay the monthly subscription before enabling sharing.
Step 4: Invite Family Members
Each Person Needs Their Own InvitationEach family member must be individually invited and must accept before they can use the shared storage. Children under 13 are added differently than adults — they get a Child Account rather than a standard invitation.
Inviting an adult family member:
- Send an invitation — sends an email to the family member’s Apple ID email address
- Invite in person — lets them sign into their Apple ID directly on your device to join immediately
Adding a child under 13 (Child Account):
If the family member is physically present, the “Invite in Person” option bypasses the email invitation flow entirely. They sign into their Apple ID on your device, which adds them to the group immediately without any waiting for email delivery or invitation acceptance. This is also more reliable for family members who don’t regularly check email on their devices.
Step 5: How Family Members Accept the Invitation
Each Member Must Complete This on Their Own DeviceUntil a family member accepts the invitation, they’re not in the group and can’t access shared storage. The acceptance process is straightforward but the invitation notification can sometimes be missed — particularly if the family member has notifications silenced or doesn’t regularly check the email associated with their Apple ID.
Family Sharing invitations expire after 7 days if not accepted. If a family member missed the invitation or it expired, the organiser needs to go to Family Sharing settings, tap the person’s name in the pending invitations list, and resend the invitation. The family member also receives a new notification and email.
Step 6: Confirm Members Are Using the Shared Storage
Verify Everything Is Working on Each DeviceAfter joining, each family member should confirm their iCloud storage is showing the shared pool — not their old individual storage. If someone still sees only 5 GB or 50 GB of storage, they’re not yet connected to the shared plan.
Each family member checks this on their own device:
The clearest confirmation is seeing the full shared plan’s storage total in each family member’s iCloud storage bar. On a 2 TB plan, every member’s storage bar should show “2 TB” as the total — not 200 GB or 5 GB. The organiser can also see how much each member is using by going to Settings → Family Sharing → iCloud Storage — a breakdown shows each member’s usage within the shared pool.
Step 7: Monitor and Manage Family Storage Usage
Keeping Track of Who Uses WhatThe family organiser can see a breakdown of how much storage each member is using — useful for monitoring whether anyone is close to causing the whole group to run out of space, and for identifying whether it’s time to upgrade the plan.
As the organiser:
Each family member can see their own usage:
Even though the organiser pays for and can see how much each member uses, they cannot view, access, or delete another member’s iCloud files, photos, or backups. Privacy is preserved — the organiser sees usage statistics (how much space someone is using and which app categories) but not the actual content. Only the individual member can manage and delete their own iCloud data.
What’s Shared vs Private in iCloud Family
The Most Commonly Misunderstood PartThe most important thing to understand about iCloud Family Sharing storage is that only the storage capacity is shared — not the files. Each family member’s iCloud Drive files, photos, messages, and device backups remain completely private and accessible only to them. The shared pool is just a larger tank everyone draws from.
| Feature | Shared With Family? | Notes |
|---|---|---|
| iCloud storage capacity | ✔ Yes | All members draw from the same pool |
| iCloud Drive files and folders | ✘ No | Private per user — share manually via shared folders |
| iCloud Photos library | ✘ No | Private — use Shared Albums or Shared Photo Library |
| Device backups | ✘ No | Each device’s backup is private to its owner |
| App Store purchases | ✔ Yes | Shared if Purchase Sharing is enabled in Family Sharing |
| Apple TV+ subscription | ✔ Yes | Included with iCloud+, shared across group |
| iCloud Mail, Messages, Notes | ✘ No | Completely private per Apple ID |
| iCloud Keychain (passwords) | ✘ No | Strictly private — never shared |
| Screen Time reports (children) | ✔ Yes | Organiser can see child members’ Screen Time |
| Location sharing | Optional | Each member opts in or out via Find My |
To share photos between family members, use iCloud Shared Photo Library — a separate feature where you designate a shared library that multiple people can contribute to and view. Set it up in Settings → Photos → Shared Library on each device. Or use Shared Albums in Photos for a lighter approach where you selectively share specific albums. Neither of these options is automatic — each family member must opt in and set it up on their own device.
Troubleshooting Common iCloud Family Storage Problems
Fixes for the Most Frequent Setup IssuesFamily member still sees only 5 GB after accepting
Invitation not received
Storage sharing option isn’t visible in Family Sharing settings
A member’s data is filling the pool faster than expected
Shared storage is a single pool — if one family member fills it, everyone else runs out of iCloud backup space too. If a family member is a heavy user (large photo library, video content, many device backups), consider whether the 2 TB or larger plan is more appropriate than the 200 GB plan. The organiser can see each member’s usage breakdown in Family Sharing → iCloud Storage to identify if one person is disproportionately filling the shared pool.
Removing a Member From Family Storage Sharing
What Happens When Someone LeavesWhen a family member leaves the group or is removed by the organiser, they lose access to the shared storage pool. Their iCloud data isn’t deleted — but they return to the free 5 GB plan, which means their backups and iCloud Drive sync will fail if they’re using more than 5 GB. They need to set up their own iCloud+ plan to continue using iCloud services at their current scale.
Removal from Family Sharing takes effect immediately and the member’s iCloud sync stops working if they exceed 5 GB. Give them advance notice so they can subscribe to their own plan first — this prevents interruptions to their iPhone backup and iCloud Drive sync. The conversation is easier than explaining why their photos stopped backing up after the fact.
Pro Tips: Getting the Most From iCloud Family Storage
Set up iCloud+ on each member’s device before removing any old paid plans. If a family member currently pays for their own 50 GB or 200 GB iCloud plan, they’ll be charged for it until it’s cancelled. Once they join the family group and confirm the shared storage is working, they can cancel their individual plan from Settings → [Name] → iCloud → Manage Account Storage → Change Storage Plan → Downgrade Options. Don’t cancel the old plan first — confirm shared storage is working, then cancel the individual plan.
Enable iCloud Photos on every family member’s device to maximise the value. The biggest benefit of shared storage for most families is that everyone can have unlimited iCloud Photos backup without paying separately. After joining the family group, each member should go to Settings → [Name] → iCloud → Photos and enable Sync this iPhone. This ensures every photo is backed up to iCloud, consuming the shared pool rather than device storage. Our hidden Mac features guide covers the Shared Photo Library feature that lets family members contribute to a single shared photo collection.
Set up Screen Time limits for children using the shared storage. Children using the shared iCloud+ pool can accidentally consume large amounts of storage through game saves, app data, and device backups. Set up Screen Time via Settings → Family Sharing → Screen Time for child accounts — not to limit storage directly, but to manage app usage that drives storage consumption. App limits for games and social media reduce the incidental storage accumulation from those categories.
Check family storage usage monthly, not just when it runs out. The organiser can see each member’s storage breakdown in Family Sharing → iCloud Storage. A monthly 60-second check reveals if one member’s usage is trending toward filling the pool before it becomes a problem. Catching someone at 180 GB on a 200 GB plan gives everyone time to clean up or upgrade rather than discovering it when backups fail overnight.
Common Mistakes to Avoid
The most common misunderstanding about iCloud Family Storage is that enabling it gives family members access to each other’s files. It doesn’t. Shared storage means shared capacity — each person’s files remain private and only accessible to them. If you want to share actual files, set up shared folders in iCloud Drive or use the Shared Photo Library for photos — these are separate features that require separate setup.
If the organiser downgrades to the free 5 GB plan or cancels iCloud+, storage sharing ends for the entire family immediately. Every member loses access to the shared pool and returns to 5 GB individual storage, which almost certainly causes immediate backup failures across all family devices. The organiser must maintain an active iCloud+ plan of 200 GB or higher for family storage sharing to remain active.
Family Sharing gives the organiser visibility into members’ app purchases, location (if they consent), and storage usage statistics. More importantly, it can allow the organiser to impose Screen Time restrictions. Only add people as family members who you genuinely want in your Family Sharing group — the designation has implications beyond just storage, and removing someone disrupts their iCloud access immediately.
Apple IDs from different countries or regions cannot be in the same Family Sharing group. If a family member created their Apple ID in a different country than yours (for example, a university student who created their Apple ID while living abroad), they may need to change their Apple ID country/region before joining your group — a process that requires cancelling any active subscriptions and removing any stored credit balance first.
FAQ: iCloud Shared Storage for Family
How do I set up iCloud shared storage for family on iPhone?
To set up iCloud shared storage for family on iPhone, the organiser opens Settings → [Name] → Family Sharing and sets up a Family Sharing group if one doesn’t exist. Then upgrade the organiser’s iCloud plan to 200 GB or higher via Settings → [Name] → iCloud → Manage Account Storage → Change Storage Plan. After upgrading, go back to Family Sharing → iCloud Storage and enable Share with Family. Each family member then needs to be invited and must accept — after acceptance, their iCloud storage automatically draws from the shared pool.
Can family members see each other’s iCloud files when sharing storage?
No — sharing iCloud storage capacity does not give family members access to each other’s files, photos, messages, or any personal data. Each person’s iCloud Drive, Photos library, backups, and all other iCloud data remains completely private and accessible only to them. The organiser can see how much storage each member is using (in gigabytes by category) but cannot view, access, or delete any member’s actual content. Storage sharing is purely about pooling capacity, not pooling files.
What happens to family members’ iCloud data if I stop paying for iCloud+?
If the organiser cancels or downgrades the iCloud+ plan, every family member immediately loses access to the shared storage pool and returns to the free 5 GB plan. This means any iCloud data they have beyond 5 GB becomes read-only — they can access existing files but iCloud stops syncing new photos, backups fail, and iCloud Drive stops updating. Their data is not deleted, but they need to subscribe to their own iCloud+ plan to restore normal function. Always inform family members before changing or cancelling the shared plan.
How many people can share iCloud storage in one family?
A Family Sharing group supports up to 6 people total — the organiser plus up to 5 additional members. All 6 people share the same iCloud+ storage pool. Apple IDs for children can be created by the organiser as Child Accounts; adult members receive an invitation they must accept. Members must all have Apple IDs in the same country or region for the group to work.
Can I share the 50 GB iCloud plan with family?
No — the 50 GB iCloud+ plan ($0.99/month) and the free 5 GB plan cannot be shared with family members. Only the 200 GB ($2.99/month), 2 TB ($9.99/month), 6 TB ($29.99/month), and 12 TB ($59.99/month) plans support family storage sharing. If you’re currently on the 50 GB plan and want to share storage, you’ll need to upgrade to at least 200 GB before the family storage sharing option becomes available in your Family Sharing settings.
What iCloud plan is best for a family of four?
For a family of four with typical usage — iPhone backups for all members, iCloud Photos for two or more people, and basic iCloud Drive usage — the 2 TB plan at $9.99/month is generally the most comfortable choice. The 200 GB plan at $2.99/month can work for families who are careful about storage use, but photo libraries grow quickly and many families outgrow 200 GB within a year or two. At $7/month more than the 200 GB plan, the 2 TB plan eliminates storage management stress for most families with multiple active Apple users.
iCloud Shared Storage for Family — Complete Setup Checklist
- 1Check requirements — each member needs their own Apple ID in the same country; organiser must be 18+ with a payment method on file
- 2Choose the right plan — 200 GB minimum to enable sharing; 2 TB recommended for most families of 4–6
- 3Create Family Sharing group — Settings → [Name] → Family Sharing → Set Up Your Family (organiser only)
- 4Upgrade iCloud+ plan — Settings → iCloud → Manage Account Storage → Change Storage Plan; select 200 GB or higher
- 5Enable storage sharing — Family Sharing → iCloud Storage → Share with Family (this step is often missed)
- 6Invite family members — Add Member for each adult; Create Child Account for under-13s
- 7Members accept invitations — each person taps Accept in the notification or in Settings → Family Sharing
- 8Confirm shared storage is active — each member checks Settings → iCloud to see the full shared plan total in their storage bar
- 9Cancel individual plans — members who had their own iCloud+ plans should downgrade after confirming shared storage is working
- 10Monitor usage monthly — organiser checks Family Sharing → iCloud Storage to track each member’s consumption
One Last Thing
Setting up iCloud shared storage for family takes about 10 minutes once you know the correct sequence of steps — but the order matters. Create the group, upgrade the plan, enable sharing, then invite members. Doing it in the right order prevents the common situation where members are invited before sharing is enabled and then can’t figure out why they still see only 5 GB.
Once it’s running, it genuinely simplifies the household’s Apple subscription management. One payment, one plan to monitor, and everyone’s devices back up reliably. For most families that’s worth more than the monthly cost in saved time and avoided “iPhone storage is full” conversations.
Wrapping Up
iCloud Family Sharing storage is one of Apple’s most practical subscription features — replacing five separate $0.99/month plans with one shared 200 GB or 2 TB plan at a fraction of the combined cost. The setup process is well-designed once you understand that storage sharing, Family Sharing group creation, and the plan upgrade are three separate steps that each need to be done in the right order. Work through the checklist above, confirm each step completed correctly, and the whole family is up and running with solid iCloud coverage within a single session.
ⓘ Disclaimer: This article is for informational purposes only. CrazyErrors is not affiliated with Apple Inc. iCloud+ plan pricing, storage tiers, and feature availability are subject to change by Apple. Prices shown reflect US pricing as of 2026 — prices vary by country and region. For official Apple iCloud Family Sharing guidance and current pricing, visit support.apple.com/en-us/HT201079.