
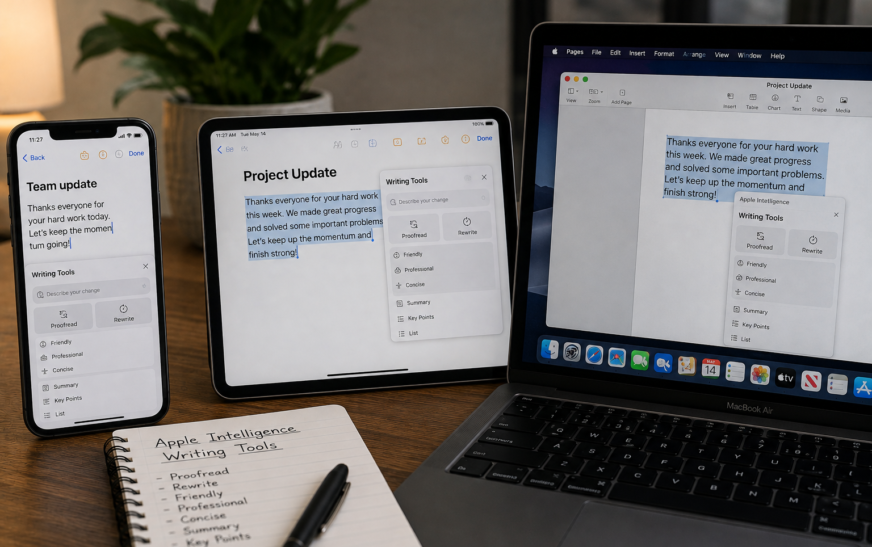
To use Apple Intelligence Writing Tools, select any text you’ve typed in a text field — in Mail, Notes, Messages, Pages, or most third-party apps — then tap the Writing Tools button that appears in the formatting toolbar or in the text selection menu. On iPhone and iPad the button appears above the keyboard; on Mac it appears in the Edit menu or right-click context menu. Choose from Proofread, Rewrite, Friendly, Professional, Concise, Summary, Key Points, List, or Table — the tool processes your text on-device and shows you the result with an option to accept, reject, or compare with the original.
Apple Intelligence Writing Tools are built into every text field across iPhone, iPad, and Mac — and once you start using them, it’s hard to imagine writing without them. Whether you’re polishing a professional email, softening a message that came out too blunt, or turning a wall of text into a scannable bullet list, the tools work directly inside the app you’re already using without copying anything to a separate AI interface.
This guide covers every Writing Tool Apple Intelligence offers, how to access them on each device, practical examples of when each one is most useful, how to enable Apple Intelligence if it isn’t showing up yet, and how to get the most out of each tool in your daily workflow.
Devices and Requirements for Apple Intelligence Writing Tools
Check This First if Writing Tools Aren’t AppearingApple Intelligence — the system that powers Writing Tools — only runs on specific hardware. If you don’t see a Writing Tools button when selecting text, the most likely reason is that your device doesn’t meet the requirements, or Apple Intelligence hasn’t been enabled yet.
| Device | Minimum Model | Minimum OS | Writing Tools |
|---|---|---|---|
| iPhone | iPhone 15 Pro / iPhone 16 or later | iOS 18.1 or later | ✔ Supported |
| iPad | iPad Pro (M1 chip) or later, iPad Air (M1) or later, iPad mini (A17 Pro) | iPadOS 18.1 or later | ✔ Supported |
| Mac | Any Mac with M1 chip or later (2020+) | macOS Sequoia 15.1 or later | ✔ Supported |
| iPhone 15 (standard) | A16 chip — not supported | — | ✘ Not supported |
| Older iPads (A12 or earlier) | Pre-M1 chip — not supported | — | ✘ Not supported |
| Intel Macs | Pre-M1 — not supported | — | ✘ Not supported |
Apple Intelligence Writing Tools require the device language to be set to English (US), English (UK), English (Australia), or another supported English variant. If your device is set to a different language, Writing Tools won’t appear even on compatible hardware. On iPhone: Settings → General → Language & Region → iPhone Language. Apple has been expanding Writing Tools to additional languages with each major update — check the Apple Intelligence supported languages list for the most current availability.
How to Enable Apple Intelligence
Required First Step if Writing Tools Aren’t ShowingApple Intelligence must be enabled on your device before Writing Tools appear anywhere. On eligible devices it’s usually enabled by default after updating to iOS 18.1 or later — but on older eligible devices you may have been on a waiting list, or it may have been turned off manually.
On iPhone and iPad:
On Mac:
Apple Intelligence Writing Tools process your text directly on the device using the Apple silicon chip — no data is sent to Apple’s servers or any external AI service for Writing Tools to function. Your drafts, messages, and documents stay private. An internet connection is only needed to download the initial Apple Intelligence model files, not for ongoing use. This is a significant privacy advantage compared to browser-based AI writing tools.
How to Access Writing Tools on iPhone, iPad, and Mac
Three Ways to Open Writing Tools Depending on Your DeviceWriting Tools appear whenever you have text selected in a compatible text field. The exact method for accessing them varies slightly across devices, and there are multiple access paths on each platform.
On iPhone and iPad
On Mac
Every Apple Intelligence Writing Tools change is reversible. If you apply a rewrite and don’t like the result, press Command + Z on Mac, or tap Undo in the toolbar on iPhone and iPad, to restore your original text immediately. The “Original” button in the review panel also lets you flip between the AI suggestion and your original text before committing.
Every Apple Intelligence Writing Tool — What Each One Does
Full Guide to All Nine Tools🔍 Proofread
What it does: Reviews your text for grammar, spelling, punctuation, and word choice errors. Instead of only highlighting mistakes like a spell checker, Proofread shows you the corrected version with changes marked — so you can see exactly what was changed and decide whether to accept each correction.
Best for: Any text before you send or publish it. Emails, documents, important messages. Works well on longer text where multiple errors might be scattered throughout.
What it doesn’t do: It won’t restructure your sentences for style or change your voice — it corrects errors while preserving your original phrasing and tone.
✏️ Rewrite
What it does: Rewrites your text from scratch while preserving its core meaning. The result uses different sentence structures, vocabulary, and phrasing — useful when your original draft feels clunky or repetitive and you want a fresh take on the same ideas.
Best for: A draft that conveys the right information but reads awkwardly. Also useful as a starting point for a second draft when you’re stuck.
What to expect: The rewrite maintains your intended message but may sound somewhat different from your natural voice. The Compare view lets you blend elements of both versions.
😀 Friendly
What it does: Rewrites your text in a warmer, more casual, and approachable tone — adding conversational phrasing, softening formal language, and making the text feel less stiff without losing its meaning.
Best for: Turning a business-formal message into something warmer for a colleague you know well. Softening a response that reads as too direct or blunt. Making customer-facing communications feel more human.
Example use case: You’ve written “Your request has been received and will be processed within 3 business days” — Friendly might suggest “Got your request! We’ll have it sorted for you within the next few business days.”
👔 Professional
What it does: Rewrites your text in a more formal, polished, and businesslike tone — removing casual language, filler phrases, and informalities while making the writing more precise and authoritative.
Best for: Informal drafts that need to go to a manager, client, or formal audience. Converting a quickly typed note into a polished email. Cover letters, business proposals, and formal requests.
Example use case: “Hey, just wanted to follow up on that thing we talked about last week” becomes “I’m writing to follow up on our discussion from last week regarding [topic].”
✂️ Concise
What it does: Shortens your text by removing redundant phrases, filler words, and unnecessary repetition — keeping the core message while significantly reducing word count. Typically reduces text by 30–50% without losing essential meaning.
Best for: Emails that ramble. Texts that are longer than they need to be. Any situation where you need to say the same thing in fewer words.
What it removes: Qualifiers (“I was just wondering if maybe”), redundant context (“As I mentioned earlier”), unnecessary preamble (“I wanted to reach out because”), and repeated ideas stated multiple ways.
📋 Summary
What it does: Generates a short, condensed summary of your selected text — typically two to four sentences that capture the key points without the detail. The summary is inserted as new text rather than replacing the original.
Best for: Creating a TL;DR for a long email or document. Adding a summary paragraph to a long report. Generating a quick overview of meeting notes or detailed instructions.
Note: Summary works best on text of at least 3–4 paragraphs — very short text doesn’t benefit meaningfully from summarisation.
✅ Key Points
What it does: Extracts the most important ideas from your text and formats them as a clean bulleted list of key points. Unlike Summary (which produces prose), Key Points produces a scannable list.
Best for: Turning a dense paragraph of instructions into a checklist. Converting meeting notes into action items. Creating a quick reference list from a longer explanation.
Practical workflow: Write your full thought as natural text, then use Key Points to instantly produce a structured list version — useful for presentations, handouts, or any situation where a bulleted format is clearer than prose.
📝 List
What it does: Converts text written as flowing sentences into a formatted list. Similar to Key Points but focuses on preserving more of the original detail rather than just extracting top-level ideas. Useful when text is already list-like in content but written in paragraph form.
Best for: Reformatting text that reads “You’ll need to bring your ID, proof of address, the signed contract, and two passport photos” into a proper itemised list.
📊 Table
What it does: Converts text containing comparative or structured information into a formatted table. Apple Intelligence analyses the text to identify what the rows, columns, and cells should be, then generates the table automatically.
Best for: Text that compares multiple options across the same attributes. A list of products with prices and features. A schedule described in paragraph form. Any information where a grid format would make it easier to scan and compare.
Supported in: Notes, Pages, and apps that support rich text tables. Plain text fields (like a basic email reply) may produce the table as text rather than a formatted grid.
Using Writing Tools in Specific Apps
App-by-App WalkthroughMail is where most people get the most value from Writing Tools. When composing or replying to an email, Writing Tools let you transform a quickly typed draft into polished, appropriately toned communication without leaving the app.
Beyond Writing Tools, Mail in iOS 18 and macOS Sequoia also offers Smart Reply — Apple Intelligence reads the email you received and suggests reply options at the bottom of the compose window. These are different from Writing Tools: Smart Reply generates the content of a reply, while Writing Tools improve content you’ve already written. Both features work together — use Smart Reply as a starting point and Writing Tools to refine it.
💬 Messages
In Messages, Writing Tools are accessible when typing in the message compose field — making it easy to soften a message, fix typos before sending, or make a casual message more clear.
You can only apply Writing Tools to text you’re composing — not to messages you’ve received from other people. If you want to summarise a long received message, copy the relevant text, paste it into Notes, use Summary or Key Points there, and refer back to your Notes. Apple Intelligence can read and summarise notifications from Messages in the Notification Summary feature, but that’s separate from the Writing Tools in the compose field.
📓 Notes
Notes is one of the best places to use the full range of Writing Tools — particularly Table and Key Points, which produce structured output that the Notes app renders beautifully.
📄 Pages
Pages on Mac and iPad has the deepest Writing Tools integration — the floating Writing Tools panel makes it easy to work on different sections of a long document without needing to reselect text each time.
Where Writing Tools Work — and Where They Don’t
Know the Limitations Before Relying on Them| App / Context | Writing Tools Available? | Notes |
|---|---|---|
| Apple Mail (compose) | ✔ Yes — full support | All nine tools; full Compare view |
| Apple Notes | ✔ Yes — full support | Table renders as native Notes table |
| Pages | ✔ Yes — full support | Floating panel available; best integration |
| Messages (compose) | ✔ Yes | Accessible from compose field selection menu |
| Safari (form fields) | ✔ Yes — text fields | Works in editable web form inputs |
| Third-party apps (UIKit text views) | ✔ Usually yes | Depends on whether app uses system text editing |
| Google Docs (in browser) | ✘ No | Google Docs uses its own editor, not system text |
| Microsoft Word for Mac | ✘ Limited | Word uses its own text engine; some versions support it via Edit menu |
| VS Code, code editors | ✘ No | Code editors use custom text engines that bypass system text |
| Read-only content | ✘ No | Text must be editable for Writing Tools to appear |
If Writing Tools don’t appear in an app you’re working in — like Google Docs in a browser, or a custom CMS — copy your text to Notes, apply Writing Tools there, then copy the improved text back. It adds 10 seconds to the process but gives you the full suite of tools for any text regardless of where it originated. Notes is available on every Apple device and syncs via iCloud, so you can do the staging on whatever device is most convenient.
Practical Workflows — Getting Real Value Every Day
Real Examples for Common Writing SituationsWorkflow 1: Turning a rushed email draft into a polished message
Workflow 2: Converting messy meeting notes into clean action items
Workflow 3: Fixing a blunt text message before sending
Workflow 4: Preparing comparative information as a table
Using the Compare View — Don’t Skip This
The Most Underused Feature of Writing ToolsEvery Writing Tools result comes with a Compare button that lets you flip between your original text and the AI suggestion. This isn’t just a preview — it’s how you make an informed decision about whether the rewrite actually improves things.
Writing Tools work best when applied in sequence rather than using just one. A typical professional workflow: Proofread first (fix errors), then Professional or Friendly (adjust tone), then Concise (tighten length). Running all three in sequence typically produces better output than trying to do everything with a single Rewrite tool call — because each tool is specialised for a specific dimension of the text.
Understanding Proofread Markup
Reading the Inline Correction DisplayProofread is unique among the Writing Tools because it doesn’t replace your text outright — it shows inline markup where each change is highlighted so you can review it individually before accepting. Understanding what each markup type means helps you use it more effectively.
Privacy — What Happens to Your Text
All Writing Tools Processing Is Private and On-DevicePrivacy is one of the strongest aspects of Apple Intelligence Writing Tools. Understanding how the processing works helps you use them confidently for sensitive content — drafting legal documents, personal messages, confidential business communications.
Because Writing Tools processing is on-device, you can use them confidently for content you wouldn’t want to paste into a web-based AI service — medical notes, legal drafts, confidential business communications, personal messages, and anything else where privacy matters. No copy of your text leaves the device during Writing Tools processing.
Troubleshooting — When Writing Tools Don’t Appear
Common Reasons and Fixes🚫 No Writing Tools option in the selection menu
Check: device is compatible (iPhone 15 Pro+ or iPhone 16+, M1 iPad, M1 Mac), Apple Intelligence is enabled in Settings, device language is set to English. If all three are correct, restart the device and try again.
⏳ Writing Tools option appears but shows “Loading” indefinitely
The Apple Intelligence model may still be downloading. Go to Settings → Apple Intelligence & Siri and check whether a download progress indicator is visible. Wait for the download to complete before using Writing Tools.
🌐 Working on iPhone but not on Mac
Each device requires the Apple Intelligence model to be downloaded independently. Check System Settings → Apple Intelligence & Siri on the Mac and confirm the model has finished downloading. Also confirm the Mac is M1 or later — Intel Macs are not supported.
📱 Available in some apps but not others
Writing Tools only work in apps that use the system text editing framework. Apps with custom text editors (Google Docs, VS Code, some browsers) bypass the system text layer and therefore don’t get Writing Tools. Use Notes as an intermediary — copy text in, apply tools, copy the result back.
🇺🇸 Not available in my language
Apple Intelligence Writing Tools currently require the device language to be English. If your device is set to another language, Writing Tools won’t appear. You can change the device language temporarily to access Writing Tools, then change back — though this also changes the system UI language. Apple is expanding language support with each major iOS and macOS release.
Pro Tips: Getting More From Apple Intelligence Writing Tools
Write first, improve second — never start with a blank prompt. Writing Tools are most effective when they have a complete draft to work with. A half-finished sentence or single paragraph doesn’t give the tools enough context to produce meaningful suggestions. Write your full thought as natural text first — even poorly — then use Writing Tools to polish it. The quality of the output scales with the quality and completeness of the input.
Use Concise on every email before sending. Most emails are 20–30% longer than they need to be. Running Concise as a final step before hitting Send — even on short emails — reliably removes the filler phrases and redundant context that accumulate in natural writing. It takes five seconds and makes your communication consistently cleaner. Pair it with Proofread and you’ve turned a 30-second review into a reliable pre-send quality check.
Key Points is the fastest meeting notes tool you’ll find. If you take meeting notes in Notes or Pages as flowing prose, Key Points converts the whole thing to a bulleted action list in seconds. This is particularly powerful on iPad — jot notes in Apple Notes during the meeting, select all, tap Key Points, and you have a structured summary ready to share before the meeting has even ended. Discover more hidden Apple ecosystem features in our hidden Mac features guide.
Table is underrated for planning and comparison tasks. Most people use Table to format existing content — but it’s equally useful as a planning aid. Write out the factors you’re comparing in any form (“Option A costs X and takes Y days, Option B costs X2 and takes Y2 days”) and let Table structure it. The resulting table often surfaces asymmetries and gaps in your planning that aren’t obvious in prose form.
Keep your Mac storage healthy for smooth Apple Intelligence performance. The Apple Intelligence models stored locally on your Mac are several gigabytes in size, and the writing tasks themselves use temporary working memory. A Mac with very low free storage can show sluggish Writing Tools response times. Our guide on freeing up MacBook storage without deleting files covers the fastest ways to keep storage healthy for smooth performance.
Common Mistakes to Avoid
Apple Intelligence Writing Tools are very good but not infallible. A Rewrite or Professional tone change can occasionally alter your intended meaning, drop important context, or use phrasing that doesn’t match your personal communication style. Always read the suggestion in the Compare view before accepting — particularly for Professional and Rewrite, which make the most significant changes to your text.
Writing Tools can improve how something is expressed, but they can’t supply missing substance. If your draft is vague or lacks the key information the reader needs, a Rewrite or Professional pass produces a polished version of an insufficient draft — it still won’t answer the reader’s questions. Write complete, substantive content first, then use Writing Tools to improve the expression of that content.
Running Proofread, then Rewrite, then Professional, then Concise on the same text without reviewing between each step compounds any errors. If Rewrite produces a version you’d reject, running Concise on top of it just creates a shorter version of an already-wrong output. Apply one tool at a time, review the result, and accept it before applying the next tool.
Table works best on clearly structured comparative text. On complex, nested, or ambiguous content, it may produce a table with the wrong column structure or miss some data points. Treat the Table output as a starting point and manually adjust cells that the AI misidentified or misplaced — it’s still faster than building the table from scratch, even if minor editing is needed.
FAQ: Apple Intelligence Writing Tools
How do I access Apple Intelligence Writing Tools on iPhone?
To access Apple Intelligence Writing Tools on iPhone, tap in any text field, select the text you want to improve by tapping and holding then dragging the selection handles, then either tap the Writing Tools icon (pencil with sparkle) in the formatting toolbar above the keyboard, or swipe through the text selection menu popover until you see “Writing Tools.” The Writing Tools panel then slides up showing Proofread, Rewrite, Friendly, Professional, Concise, Summary, Key Points, List, and Table as options. If Writing Tools don’t appear, confirm your iPhone is a 15 Pro or 16 model or later, iOS is updated to 18.1 or later, and Apple Intelligence is enabled in Settings → Apple Intelligence & Siri.
Do Apple Intelligence Writing Tools require the internet?
No — all nine Apple Intelligence Writing Tools (Proofread, Rewrite, Friendly, Professional, Concise, Summary, Key Points, List, and Table) process text entirely on-device using the Apple Intelligence language model stored locally on your iPhone, iPad, or Mac. No internet connection is needed for any Writing Tools function. Your text is never sent to Apple’s servers or any external service during Writing Tools processing. An internet connection is only required to initially download the Apple Intelligence model files after enabling Apple Intelligence in Settings.
What’s the difference between Rewrite and Proofread in Writing Tools?
Proofread corrects errors — it fixes grammar, spelling, and punctuation mistakes while preserving your original sentence structures and phrasing as much as possible. It shows inline markup so you can see exactly what changed. Rewrite, by contrast, starts fresh — it generates new phrasing for the same ideas, using different vocabulary and sentence structures. Use Proofread when your text is well-written and just needs error correction. Use Rewrite when the text is technically correct but reads awkwardly and you want a completely fresh take on the same content.
Which Apple devices support Writing Tools?
Apple Intelligence Writing Tools are supported on iPhone 15 Pro and iPhone 15 Pro Max, all iPhone 16 models and later, iPad Pro with M1 chip or later, iPad Air with M1 chip or later, iPad mini with A17 Pro chip, and any Mac with an M1 chip or later. Intel-based Macs, standard iPhone 15 and earlier non-Pro models, and iPads with pre-M1 chips do not support Apple Intelligence or Writing Tools. All supported devices must run iOS 18.1 / iPadOS 18.1 / macOS Sequoia 15.1 or later.
Can I use Writing Tools in Google Docs or Microsoft Word?
Writing Tools don’t work in Google Docs in a browser because Google Docs uses its own custom text editor that bypasses macOS and iOS’s system text framework. Microsoft Word for Mac has partial support in some versions — check the Edit menu for a Writing Tools option. For apps that don’t support Writing Tools natively, copy the text into Apple Notes, apply Writing Tools there, then copy the improved text back into your document. Notes is available on all Apple devices and syncs via iCloud.
Is my text private when using Apple Intelligence Writing Tools?
Yes — Writing Tools process your text entirely on your device using locally stored Apple Intelligence models. No text is sent to Apple’s servers or any third party during Writing Tools processing. Apple does not use your text content to train AI models. The on-device processing means Writing Tools work without an internet connection and are safe to use with sensitive content including medical notes, legal documents, and confidential business communications. Apple publishes technical documentation on Apple Intelligence privacy at apple.com/apple-intelligence.
Apple Intelligence Writing Tools — Complete Quick Reference
- 1Check device compatibility — iPhone 15 Pro+, M1 iPad, M1 Mac; iOS/iPadOS 18.1+, macOS Sequoia 15.1+
- 2Enable Apple Intelligence — Settings → Apple Intelligence & Siri → On; download models if prompted
- 3Access Writing Tools — select text → Writing Tools icon in toolbar (iPhone/iPad) or Edit → Writing Tools (Mac)
- 4Proofread — fixes grammar, spelling, punctuation; shows inline markup with individual corrections
- 5Rewrite — fresh phrasing for the same ideas; use Compare view before accepting
- 6Friendly — warmer, more casual tone; great for softening blunt messages
- 7Professional — formal, polished, businesslike; removes casual language and filler
- 8Concise — removes filler and redundancy; typically cuts 30–50% of word count
- 9Summary — 2–4 sentence condensed overview; best on 3+ paragraph text
- 10Key Points — bulleted list of main ideas; ideal for meeting notes and instructions
- 11List — converts prose to itemised list; preserves more detail than Key Points
- 12Table — converts comparative text to formatted table; use Notes as staging area for unsupported apps
- 13Best workflow — Proofread first, then tone tool, then Concise; always use Compare before accepting
One Last Thing
Apple Intelligence Writing Tools work best when you think of them as a fast editing layer rather than a writing replacement. Write naturally, then run the tools in sequence — Proofread to clean up errors, a tone tool to match your audience, Concise to tighten the result. Three tools, 30 seconds, reliably better output than what you started with. That’s the workflow that makes Writing Tools genuinely useful rather than an occasional novelty.
The privacy aspect is worth repeating: everything happens on your device, nothing leaves it. That means you can use Writing Tools on content you’d never paste into a web-based AI tool — drafts of sensitive emails, medical notes, confidential business documents. That combination of capability and privacy is what separates Writing Tools from the alternatives.
Wrapping Up
Apple Intelligence Writing Tools represent a meaningful addition to the writing workflow on iPhone, iPad, and Mac. Nine purpose-built tools covering error correction, tone adjustment, length reduction, and structural reformatting — all running on-device, all accessible directly inside the apps you already use. The learning curve is minimal: select text, tap Writing Tools, pick a tool. The consistent use of Compare before accepting means you always stay in control of the final output.
ⓘ Disclaimer: This article is for informational purposes only. CrazyErrors is not affiliated with Apple Inc. Apple Intelligence features, device compatibility, supported languages, and availability may change with future iOS, iPadOS, and macOS updates. Information reflects Apple Intelligence as of 2026. Writing Tools output should always be reviewed before use in professional or sensitive communications — AI-generated suggestions may occasionally contain errors or unintended meaning changes. For official Apple Intelligence documentation, visit apple.com/apple-intelligence.