
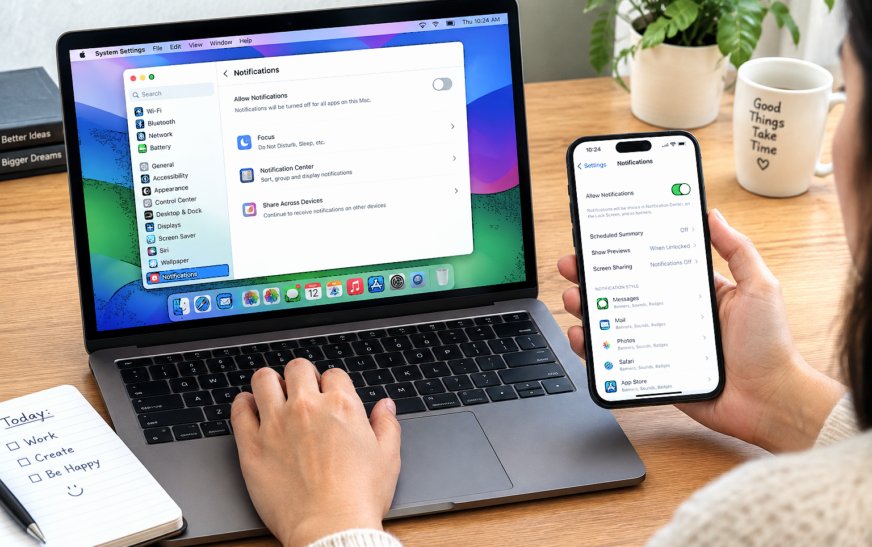
To turn off notifications on MacBook but not iPhone, use Do Not Disturb — but you must disable Focus syncing first, or it will silence your iPhone too. On your Mac: click the Control Center icon (top-right menu bar) → Focus → Do Not Disturb to enable it. Then go to System Settings → Focus → Do Not Disturb → turn off “Share Across Devices.” With that setting off, Do Not Disturb on your Mac stays on your Mac and leaves your iPhone’s notifications completely untouched. For a permanent per-app approach without Focus mode, go to System Settings → Notifications and toggle off individual apps — changes made here only affect the Mac.
Trying to turn off notifications on a MacBook but not an iPhone exposes one of the Apple ecosystem’s most misunderstood features — Focus syncing. When you enable Do Not Disturb or any Focus mode on your Mac, Apple’s default behaviour is to immediately activate the same Focus mode across every device signed into your Apple ID. Your iPhone goes silent, your iPad goes quiet, and your Apple Watch stops buzzing — all because you wanted to work without Mac notification banners.
The reverse is equally frustrating: you silence your iPhone to sleep or focus, and your MacBook screen fills with notification banners because it didn’t get the memo. Apple designed cross-device Focus as a convenience feature, but for anyone who works at their Mac while keeping their phone available for calls and messages, it creates exactly the opposite of what’s needed.
This guide covers every method for controlling Mac notifications independently of iPhone — from the one setting that fixes the Focus sync problem in 30 seconds, to per-app notification control, to stopping iPhone notifications from mirroring to Mac entirely.
Why Turning Off Mac Notifications Also Silences Your iPhone — Explained
The Two Reasons Notifications Sync Between Mac and iPhoneThere are two separate mechanisms that cause Mac and iPhone notifications to affect each other. Understanding which one applies to your situation determines which fix you need.
🔄 Reason 1: Focus Sync (Share Across Devices)
When you turn on Do Not Disturb or any Focus mode on one Apple device, the feature called “Share Across Devices” is enabled by default. This immediately activates the same Focus mode on all your other Apple devices — iPhone, iPad, Apple Watch — simultaneously. It’s designed to give you a consistent “in a meeting” or “sleeping” status across all devices, but it completely undermines the goal of silencing Mac while keeping iPhone available. Turning off Share Across Devices (Method 1) is the direct fix for this.
📱 Reason 2: iPhone Notification Mirroring on Mac
A separate feature — sometimes called “Mirror my iPhone” or iPhone notification forwarding — makes Mac display notifications from iPhone apps that don’t even exist on the Mac. Messages from an app only installed on your iPhone, carrier notifications, or app alerts can appear as banners on your Mac because the iPhone is forwarding them via Continuity. This is controlled in Mac’s System Settings → Notifications and is entirely separate from Focus modes.
| What’s Happening | Cause | Fix |
|---|---|---|
| Enabling DND on Mac also silences iPhone | Focus “Share Across Devices” is ON | Method 1 — disable Share Across Devices |
| Enabling DND on iPhone also silences Mac | Focus “Share Across Devices” is ON | Method 1 — disable Share Across Devices |
| iPhone app notifications appear on Mac | iPhone notification mirroring is ON | Method 3 — turn off iPhone mirroring |
| Specific app notifications won’t stop on Mac | App has notifications enabled in Mac settings | Method 2 — per-app notification control |
| Want permanent silence on Mac, not temporary | Per-app setting needed | Method 2 — disable apps in Notifications |
Method 1: Enable Do Not Disturb on Mac With Focus Sync Turned Off
Start Here — The Most Important Setting Most Users Don’t Know AboutThe single most impactful change is turning off “Share Across Devices” for Do Not Disturb (and any other Focus mode you use). With this setting disabled, activating Do Not Disturb on your Mac stays local — your Mac goes quiet while your iPhone continues receiving every call, message, and app notification normally. This is a one-time setting that permanently separates Mac and iPhone Focus states.
Step 1: Enable Do Not Disturb on Mac only
Step 2: Disable Share Across Devices so iPhone is not affected
With “Share Across Devices” turned off for Do Not Disturb, enabling it on your Mac leaves your iPhone completely unaffected — notifications, calls, and messages continue arriving on the iPhone as normal. Your Mac’s menu bar shows the crescent moon icon confirming DND is active there only. The same is true in reverse: enabling DND on your iPhone no longer silences the Mac. Each device now manages its own Focus state independently.
There are two related but distinct settings in the Focus menu: “Share Across Devices” (which activates the Focus mode on other devices) and “Focus Status” (which tells other people in iMessage that you have notifications silenced). Turning off Share Across Devices prevents the Focus from activating on your iPhone but doesn’t affect whether people see your Focus status in Messages. These are independent settings and both can be configured separately.
Method 2: Turn Off Notifications Per App on Mac
For Permanently Silencing Specific Apps on Mac Without Using Focus ModeIf you don’t want to use Focus mode at all — or if you want specific apps permanently silenced on Mac regardless of whether DND is active — macOS lets you disable notifications for each app individually in System Settings. Changes made here only affect the Mac; your iPhone’s notification settings for the same apps remain completely separate.
At the top of System Settings → Notifications, there’s a setting called “Show notifications when display is sleeping” and “Show notifications when screen is locked” — but there’s no single master off switch for all notifications in modern macOS. The closest equivalent is enabling Do Not Disturb (Method 1). For a more granular permanent approach, work through the app list in Notifications and set the alert style to None for every app — this suppresses banners and sounds while still allowing notification badges on Dock icons if needed.
Method 3: Stop iPhone Notifications From Appearing on Mac
Specifically for iPhone App Notifications That Appear on MacSeparate from Focus sync, Apple’s Continuity feature can mirror your iPhone’s notifications directly onto your Mac — meaning apps that don’t even exist on your Mac (carrier messages, iPhone-only apps, certain social apps) show up as Mac notification banners. This is the iPhone Notification Mirroring feature, introduced in iOS 18 and macOS Sequoia, and it has its own dedicated toggle that’s completely independent of Focus modes.
Turn off iPhone Notification Mirroring on Mac:
Turn off Notification Mirroring from iPhone side:
This is the most important distinction in this entire guide: iPhone Notification Mirroring (which forwards iPhone app notifications to Mac) and Focus Sync (which activates Focus modes across devices) are completely independent features controlled in completely different places. You can turn off one without affecting the other, and you can have both off simultaneously. Many users fix the Focus sync issue and still see iPhone notifications on Mac because Notification Mirroring is still active — and vice versa.
Method 4: Silence Notification Sounds on Mac Only
For Visual Notifications Without the Disruptive Sounds — No iPhone ImpactIf the issue isn’t notification banners themselves — you don’t mind seeing them, you just don’t want the sounds — Mac’s notification sound settings can be disabled independently for every app without affecting iPhone audio at all. This is one of the least intrusive approaches: notifications still appear visually on Mac for awareness, but the sounds and chimes that interrupt focus are removed.
Silence notification sounds globally on Mac:
Silence all Mac alert sounds instantly from Control Center:
Muting sound on Mac — whether via the volume key, Control Center slider, or per-app notification sound settings — has zero effect on iPhone volume. Your iPhone rings, chimes, and vibrates exactly as before. Mac and iPhone audio are entirely separate hardware and software systems. This makes the sound-muting approach one of the cleanest ways to reduce Mac notification disruption without any risk of accidentally silencing the iPhone.
Method 5: Create a Dedicated “Mac Only” Focus Mode
A Custom Focus Mode That Never Affects iPhone — Permanent SolutionRather than modifying the standard Do Not Disturb Focus mode — which other household members might also use in ways that depend on its shared behaviour — creating a completely new custom Focus mode for Mac-only work is the cleanest long-term solution. A custom Focus mode can be configured to never share across devices, never show on iPhone, and allow exactly the notifications you want through on Mac while blocking the rest.
The custom Focus mode you create on Mac appears on all your Apple devices because Focus modes themselves sync through iCloud. What doesn’t sync (once Share Across Devices is off) is the activation state. The “Mac Work” Focus mode is available on iPhone, but turning it on from Mac doesn’t turn it on there — each device decides independently whether it’s active. The custom Focus can also be activated on iPhone for a different purpose with different settings, if you ever want that option.
Method 6: Schedule Do Not Disturb on Mac Only During Specific Hours
Automatic Silence During Work Hours Without Manual ActivationIf you consistently want Mac notifications silenced during specific hours — working hours, late evening, early morning — you can schedule Do Not Disturb (or your custom Focus mode) to activate and deactivate automatically on Mac. With Share Across Devices turned off, this scheduled silence stays on the Mac and your iPhone notifications are unaffected during the entire scheduled window.
This warning is worth repeating for scheduled Focus modes: if Share Across Devices is still enabled for a Focus mode, adding a schedule to it on Mac schedules it across all your Apple devices. A work-hours schedule that silences Mac from 9 AM to 6 PM will also silence iPhone during those hours if sharing is on. Always disable Share Across Devices for a Focus mode before adding a schedule to it, if Mac-only silence is the goal.
Method 7: Use Notification Summary Instead of Silencing Completely
A Middle Ground — Batch Notifications Instead of Blocking ThemIf completely silencing Mac notifications feels too aggressive — you still want to know what came in, just not in real time — macOS offers Notification Summary: a feature that batches non-urgent notifications and delivers them at a scheduled time you choose, rather than interrupting you immediately. This keeps you informed without the constant banner interruptions, and it operates entirely on Mac without any effect on iPhone’s real-time notifications.
Notification Summary on Mac is a Mac-only feature. The same apps will continue delivering real-time notifications on your iPhone — including from apps included in the Mac’s summary schedule. This makes it ideal for work-from-Mac situations: your Mac batches the low-priority noise while your iPhone keeps you reachable for urgent matters in real time. Set up a summary on Mac and leave iPhone as-is for an effective two-tier notification strategy.
Focus Mode Behaviour — With vs Without Share Across Devices
Complete Reference Table for All Scenarios| Action | Share Across Devices ON | Share Across Devices OFF |
|---|---|---|
| Enable DND on Mac | ✘ Also silences iPhone + iPad + Watch | ✔ Mac only — iPhone unaffected |
| Enable DND on iPhone | ✘ Also silences Mac + iPad + Watch | ✔ iPhone only — Mac unaffected |
| Schedule DND on Mac | ✘ Schedule applies to all devices | ✔ Schedule applies to Mac only |
| Focus Status visible in iMessage | ✔ Others see your Focus status | ✔ Still visible (separate setting) |
| iPhone app notifications on Mac | Depends on iPhone Mirroring setting | Depends on iPhone Mirroring setting |
| Disable specific app on Mac | ✔ Mac only — no iPhone effect | ✔ Mac only — no iPhone effect |
Pro Tips: Managing Mac and iPhone Notifications Independently
Set different allowed contacts per Focus mode for Mac and iPhone separately. After turning off Share Across Devices, your Work Focus on Mac can allow notifications from coworkers only, while your iPhone’s Work Focus (if you ever activate it there) can have a different allowed contacts list. Each device’s Focus configuration is independent once sharing is off. Go to System Settings → Focus → Work → People on Mac to set Mac-specific allowed contacts, then separately configure the same Focus on iPhone with its own allowed list.
Add Do Not Disturb to your Mac’s menu bar for one-click access. Go to System Settings → Control Center and find Focus — set it to “Always Show in Menu Bar.” This puts a permanent Focus indicator in the menu bar that you can click to toggle Do Not Disturb on and off in a single click, without opening Control Center. With Share Across Devices already disabled, this becomes a fast, consequence-free toggle that only affects Mac.
Use the “Announce Notifications” feature on iPhone as a backup awareness layer. If you’re silencing Mac notifications to focus and relying on iPhone for alerts, consider enabling Announce Notifications on iPhone — Siri reads notification text aloud through AirPods when your phone is locked. Go to Settings → Siri → Announce Notifications on iPhone and select which apps get announced. This way important notifications reach you via audio through your headphones without requiring you to look at either the Mac or the iPhone screen. It pairs well with Mac notifications silenced for deep work sessions.
The “When Mirroring or Sharing Display” setting is worth checking. In System Settings → Notifications, there’s an option called “Allow notifications when mirroring or sharing display” — this controls whether Mac notifications appear when you’re screen-sharing in Zoom, Teams, or presenting via AirPlay. Turn this off to prevent private notifications from appearing during presentations, entirely independently of any iPhone settings. This is one of the hidden Mac settings most users discover only after an embarrassing notification pops up mid-presentation.
Common Mistakes to Avoid
Turning off an app’s notifications in System Settings → Notifications on Mac only affects that Mac. The same app on your iPhone has completely separate notification settings — managed in iPhone’s Settings → Notifications. If you turn off Messages notifications on Mac and then wonder why Messages isn’t notifying you on iPhone either, you’ve confused yourself about where the change was made. Mac and iPhone notification settings are always independent and always configured in their respective devices’ System Settings.
macOS has a dedicated Sleep Focus that activates automatically when the Mac’s sleep schedule begins. If this has Share Across Devices enabled, your Mac going to sleep at its scheduled time also silences your iPhone — which may not be what you want. Check System Settings → Focus → Sleep and confirm Share Across Devices is configured according to your preference. Sleep Focus is often the source of “my iPhone went silent and I don’t know why” reports from people who modified their Mac’s sleep schedule.
If you want iPhone’s DND to stay iPhone-only when you activate it there, you need to turn off Share Across Devices on iPhone as well — the setting isn’t automatically turned off on all devices just because you turned it off on Mac. Open Settings → Focus on iPhone, select each Focus mode, and toggle off Share Across Devices there independently. Both devices need the setting turned off for complete independence of notification states.
Standard Do Not Disturb and Focus modes don’t automatically activate when you start a screen share in Zoom, Teams, or Google Meet on Mac. Private notifications — including messages from people you’ve set as Focus exceptions — can still appear on screen during a presentation. To prevent this: enable the “When Mirroring or Sharing Display” notification restriction in System Settings → Notifications, or manually enable DND from Control Center before starting a screen share.
FAQ: Turn Off Notifications on MacBook but Not iPhone
How do I turn off notifications on my MacBook but not my iPhone?
To turn off notifications on your MacBook but not your iPhone, use Do Not Disturb on Mac with the Focus Sync setting disabled. First, go to System Settings → Focus → Do Not Disturb and turn off “Share Across Devices” — this is the critical step that prevents the Focus mode from activating on iPhone. Then enable Do Not Disturb from the Control Center in the menu bar. With sharing off, your Mac notifications are silenced while your iPhone continues receiving every call, message, and app notification normally. For app-specific permanent silence, go to System Settings → Notifications and toggle off individual apps — these settings only affect Mac.
Why does Do Not Disturb on Mac turn off iPhone notifications too?
Do Not Disturb on Mac silences iPhone because Apple’s “Share Across Devices” feature is enabled by default for all Focus modes. This feature is designed to give you a consistent notification status across all your Apple devices when you activate a Focus mode. To stop this behaviour, go to System Settings → Focus → Do Not Disturb on your Mac and toggle off “Share Across Devices.” After this one-time change, Do Not Disturb on Mac only affects Mac. Note: you also need to make the same change on iPhone — go to Settings → Focus → Do Not Disturb on iPhone and disable “Share Across Devices” there if you also want iPhone’s DND to not affect Mac.
Why am I getting iPhone notifications on my Mac?
iPhone notifications appearing on Mac are caused by two features. The first is iPhone Notification Mirroring — a Continuity feature that forwards your iPhone’s app notifications to your Mac, even for apps not installed on Mac. To disable this: go to System Settings → Notifications on Mac and turn off the option to allow notifications from iPhone. The second is iMessage and FaceTime calls, which appear on Mac by design when signed into the same Apple ID — to disable these specifically, go to Mac’s Messages settings and FaceTime settings and disable “Calls from iPhone” and similar cross-device features.
Can I turn off specific app notifications on Mac without affecting iPhone?
Yes — app-by-app notification settings on Mac are completely independent from iPhone. Go to System Settings → Notifications on Mac, click any app in the list, and toggle “Allow Notifications” off. This only affects that app’s notifications on the Mac. The exact same app on iPhone has its own separate notification settings in Settings → Notifications on the iPhone, which remain completely unaffected by any changes you make on Mac. You can freely silence apps on Mac and keep them active on iPhone or vice versa.
How do I schedule Mac notifications to be silenced during work hours without affecting iPhone?
To schedule Mac notifications silenced during work hours without affecting iPhone: first, go to System Settings → Focus → Do Not Disturb and turn off “Share Across Devices.” Then click “Add Schedule” and set your working hours (e.g. 9:00 AM to 6:00 PM, weekdays only). With sharing disabled, this schedule activates Do Not Disturb on Mac automatically during those hours and deactivates it afterward — all without any effect on iPhone notifications. For a more refined approach, create a custom Focus mode named “Work” or “Deep Focus,” disable sharing for it, and schedule that instead to preserve the standard Do Not Disturb behaviour for evening/night use.
Does turning off notifications on Mac affect iMessage on iPhone?
Turning off notifications on Mac does not affect iMessage on iPhone, as long as you’ve disabled “Share Across Devices” for your Focus modes. The two are independent: your iPhone’s Messages app will still deliver every iMessage notification with sound and banners as normal, while your Mac’s Messages app stays silent. The only exception is if Share Across Devices is still enabled — in that case, activating a Focus mode on Mac (which silences Mac notifications) also activates that Focus on iPhone, which would affect iMessage notifications on iPhone too. Disable Share Across Devices first in System Settings → Focus to ensure Mac and iPhone iMessage notifications are fully independent.
Turn Off Notifications on MacBook but Not iPhone — 7 Proven Methods
- 1Enable DND on Mac + disable Share Across Devices — System Settings → Focus → Do Not Disturb → Share Across Devices OFF; most important step
- 2Turn off per-app notifications on Mac — System Settings → Notifications → select app → toggle Allow Notifications OFF; only affects Mac
- 3Stop iPhone notifications mirroring to Mac — System Settings → Notifications → turn off “Allow notifications from iPhone”; separate from Focus sync
- 4Silence Mac notification sounds only — per app: uncheck “Play sound”; or mute Mac volume — zero effect on iPhone audio
- 5Create a custom Mac-only Focus mode — System Settings → Focus → + button → Custom; name it; disable Share Across Devices; configure allowed apps/people
- 6Schedule DND on Mac only — System Settings → Focus → Do Not Disturb → Add Schedule; set work hours; ensure Share Across Devices is off first
- 7Use Notification Summary on Mac — System Settings → Notifications → Notification Summary; batches low-priority notifications; iPhone real-time notifications unaffected
One Last Thing
The entire problem of Mac notifications silencing iPhone (and vice versa) comes down to one setting: Share Across Devices in Focus preferences. That setting enabled by default is why so many Mac users have suffered through accidentally silenced iPhones or unexpectedly noisy Macs. Turning it off takes 30 seconds and permanently gives you independent control of each device’s notification state.
Once Focus sync is off, the per-app notification settings in System Settings → Notifications give you fine-grained, permanent control over exactly which apps are allowed to interrupt you on Mac — and none of those changes touch iPhone. The two devices become genuinely independent for notifications, which is how most people instinctively expect them to work already.
Wrapping Up
Apple’s cross-device notification system is a powerful feature for many use cases — but it works against you when your workflow requires Mac silence and iPhone availability simultaneously. The fix is straightforward once you know where to look: disable Focus sharing, adjust per-app settings on Mac independently, and optionally turn off iPhone notification mirroring. All three of these are Mac-side changes that leave iPhone exactly as it was.
ⓘ Disclaimer: This article is for informational purposes only. CrazyErrors is not affiliated with Apple Inc. Focus mode settings, notification options, and navigation paths reflect macOS Tahoe and iOS 26 as of 2026 and may vary across software versions. Settings location names may differ slightly between macOS versions. For official Apple notification support, visit support.apple.com.